

Start off with a base coat, I used Essie’s “Grow Stronger” base coat.

Apply a white nail polish as a base color for all of your nails. I used Sally Hansen’s Hard as Nails Xtreme Wear “White On”.

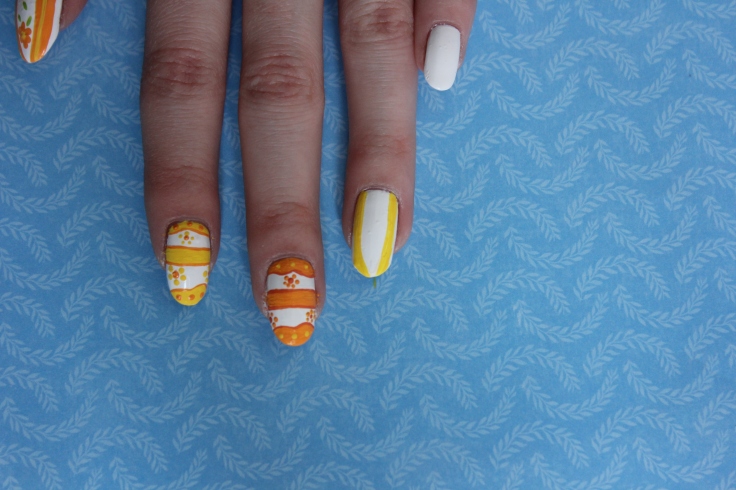
Pointer Finger Nails:
Using a pastel yellow and a detail brush, paint a squiggly line at the top and bottom of the nail and fill in the space above the top one and below the bottom one. I used Delta Ceramcoat’s “Yellow” acrylic paint mixed with Apple Barrel’s “White” acrylic paint and one of Winstonia’s “Berry Wine” brushes. Using the same color and a liner brush paint a thick line going across the middle of the nail. I used Winstonia’s “Medium” brush.

Using a light orange, outline the areas in yellow using the same brushes. I used Craft Smart’s “Tangerine” acrylic paint.

With a small dotting tool and the same orange color, paint a few dots going across the yellow squiggly section.

In the white space, paint a few flowers by placing a small orange dot for the center and small yellow dots surrounding it.

Middle Finger Nails:
The middle fingers are the same as the pointer fingers but using different colors.
Ring Finger Nails:
Paint to thick curved line on both sides of the nail, using the same striping brush and pastel yellow color.
Using the same striping brush and orange color, paint a thin line going down the middle of these thicker yellow lines.

Using a small dotting tool and the same yellow color, paint flowers in the remaining white are by dragging lines into one center area and place a small orange dot in the center. Using a fine line brush paint small leaves around these flowers by laying the tip of the brush down on the nail. I used Craft Smart’s “Light Green” acrylic paint and Winstonia’s “Fine Line” brush.

Thumb Nails:
The thumb nails are done the same as the ring finger but using different colors.
Pinky Nails:
With a makeup sponge, sponge on some of the orange color at the top and bottom of the nails. (I used a Q-tip because I didn’t have a makeup sponge

Repeat this process with the yellow color on top of the orange color.

With a dark orange, create a small, four petal flower in the center of the white. I used the same “Fine Line” brush and Craft Smart’s “Tangerine” acrylic paint mixed with Apple Barrel’s “Bright Red” acrylic paint. To create the flower, use the same technique perviously used for the leaves, simply place the tip of the brush down on the nail.

Using the same green color and small dotting tool, place a dot in the center of the petals. Then, using the “Berry Wine” brush, paint a cross going in between the petals.

If you used acrylic paint, you can clean up around the nail using a Q-tip dipped in water. If you used nail polish you can clean up around the nail using a Q-tip dipped in nail polish remover.
Lastly, apply a top coat. I used Essie’s “Gel-Setter” top coat.
Your Easter egg nails are finished!
Video Tutorial on YouTube:

Leave a comment